
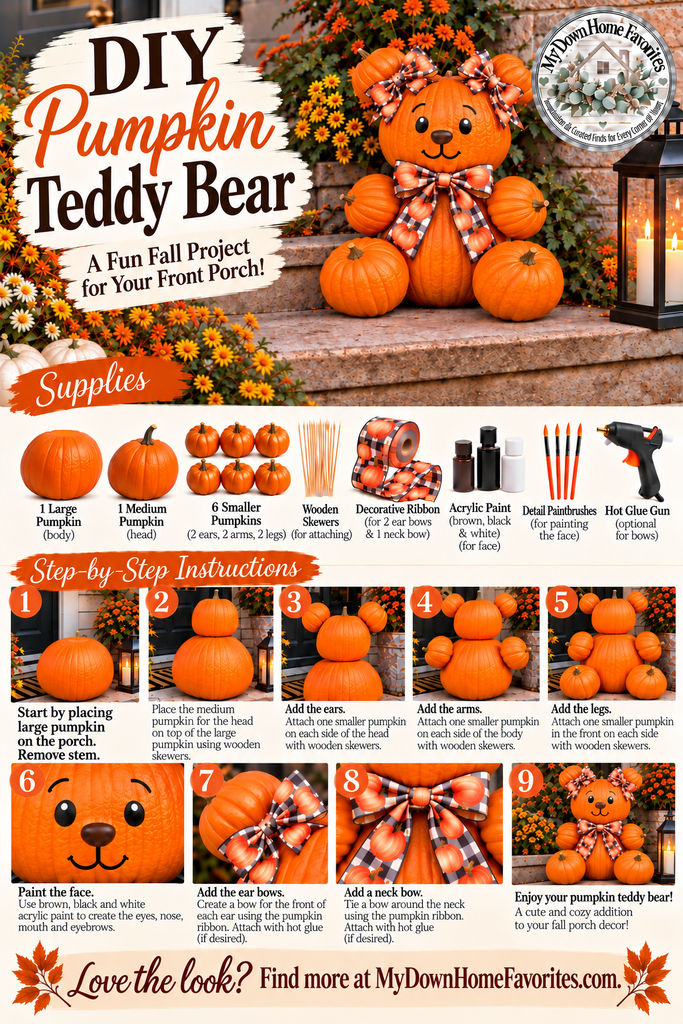
Looking for a fun and creative way to decorate your front porch this fall?
This adorable DIY Pumpkin Teddy Bear is a charming way to bring a little personality to your autumn decorations!
Using real pumpkins, some festive ribbon, and a few simple craft supplies, you can create a sweet pumpkin teddy bear that looks right at home on a cozy farmhouse porch.
Whether you place it beside your front door, near your fall mums, or alongside your favorite autumn decorations, this little bear is sure to bring a smile!
Supplies You’ll Need
- 1 large pumpkin (body)
- 1 medium, round pumpkin (head)
- 6 smaller pumpkins (ears, arms, and feet)
- Decorative fall ribbon for bows
- Brown, black, and white acrylic craft paint
- Small detail paintbrushes
- Wooden skewers for securing pumpkins
- Hot glue gun (optional, for attaching decorations)
Tip: Choose pumpkins with relatively flat surfaces so they can sit securely together.
How to Make Your Pumpkin Teddy Bear
Step 1: Prepare the Body Pumpkin
Start by removing the stem from your large pumpkin so the medium pumpkin can rest securely on top.
Choose a sturdy location on your porch where your finished bear can remain throughout the season.
Step 2: Add the Head
Place your medium-sized, round pumpkin on top of the large pumpkin.
The medium pumpkin will become your teddy bear’s head, while the large pumpkin forms its body.
Make sure the pumpkins are balanced and stable.
Step 3: Attach the Ears
Position two small pumpkins near the upper sides of the head to create adorable teddy bear ears.
Secure them carefully so they remain in place.
Step 4: Add the Arms
Place two small pumpkins on either side of the large body pumpkin.
Position them to resemble your teddy bear’s arms.
Step 5: Add the Feet
Place the remaining two small pumpkins at the bottom of the large pumpkin.
These will become your bear’s feet.
Step 6: Paint the Face
Using acrylic craft paint, add your teddy bear’s facial features.
Create two simple eyes, a cute nose, and a sweet little mouth.
Use brown, black, and white paint to give your bear an adorable hand-painted expression.
Step 7: Add Decorative Ribbon
Tie festive fall ribbon into bows.
Attach small bows near the ears and a larger bow around the neck area.
Black-and-white buffalo-check ribbon with pumpkin designs is especially cute for a farmhouse look!
Step 8: Make Final Adjustments
Check that all the pumpkins are positioned correctly.
Straighten the bows and make any final adjustments to your teddy bear’s face.
Step 9: Display Your Pumpkin Teddy Bear
Your adorable pumpkin teddy bear is ready!
Display it on your farmhouse porch alongside fall mums, lanterns, pumpkins, or other seasonal decorations.
For the prettiest presentation, place your bear where it can be seen and enjoyed without blocking your walkway.
Safety tip: Make sure the pumpkins are securely positioned on a stable surface. Use caution with sharp skewers, and avoid relying on hot glue alone to support heavy pumpkins.
Sometimes the sweetest seasonal decorations are the ones you create yourself!
This DIY pumpkin teddy bear is a fun way to add a little farmhouse charm and personality to your porch.
Shop My Curated Finds!
Want to make your own pumpkin teddy bear?
Here are a few supplies to help you recreate this adorable fall DIY project!
As an Amazon Associate I earn from qualifying purchases.
Decorative Pumpkin Ribbon
Acrylic Craft Paint
Detail Paintbrushes
Wooden Craft Skewers
Hot Glue Gun
Leave a Reply